


Technology menu
Set up your QPS email on your phone
Basic information for setting up email on a mobile device:
- Email address and username should be your full email:
- Staff: username@qps.org
- Students: StudentID@my.qps.org
- Your district network password
- Server: outlook.office365.com
How to set up your QPS email on your mobile phone
1. Android
There are two options to setup your Android device to connect to your business email account:
Option 1: Use the Outlook app from the Play Store:
- Search for the “Outlook” app in the Play Store or visit: https://play.google.com/store/apps/details?id=com.microsoft.office.outlook&hl=en
- After installing Outlook, open the app
- Enter your email address (“username”@qps.org), press next
- Enter your password, press next
- If the process is not complete at this point:
- Verify that your email address and password are correct.
- Verify that ‘Username’ is set to your email address (“username”@qps.org).
- Verify that the Server is set to “outlook.office365.com”.
- Your account is now set up.
- To access your email, select the Outlook icon within the list of apps.
Option 2: Use your Android phone’s built-in email functionality:
Note: This is for Android 8.0, not all Android phones are identical.
- Open you list of apps
- Select Settings
- Select Users & Accounts or something similar.
- Select Add account
- Select the option ‘Exchange’
- Enter your email address (“username”@qps.org), press next
- Enter your password, press next
- Verify that ‘Username’ is set to your email address (“username”@qps.org).
- Verify that the Server is set to “outlook.office365.com” and leave the other settings at their
default. - Wait for the account to be verified. This may take several minutes
- After your account is verified, choose your preferences and press Next
- Your account is now set up. You may choose a name for the account if you would like, but it is
not necessary. - To access your email, select the Email icon within the launcher menu.
2. iPhone
There are two options to setup your Android device to connect to your business email account:
Option 1: Use the Outlook app from the App Store:
- Search for the “Outlook” app in the App Store or visit: https://itunes.apple.com/us/app/microsoft-outlook/id951937596?mt=8
- After installing Outlook, open the app
- Enter your email address (“username”@qps.org), press next
- Enter your password, press next
- If the process is not complete at this point:
- Verify that your email address and password are correct.
- Verify that ‘Username’ is set to your email address (“username”@qps.org).
- Verify that the Server is set to “outlook.office365.com”.
- Your account is now set up.
- To access your email, select the Outlook icon within the list of apps.
Option 2: Use your phone’s built-in email functionality:
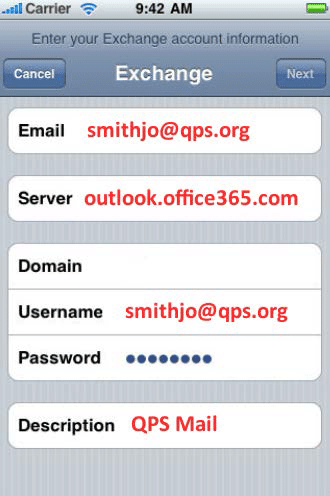
- To add an Exchange account to your iOS device, tap Settings > Mail, Contacts, Calendars > Add
Account > Microsoft Exchange. - On the next screen, enter your complete email address, domain, username, password, and a
description (which may be anything you like).- The settings are:
‘Username’ is your email address (“username”@qps.org).- Server is “outlook.office365.com”.
- Leave the domain field blank.
3. Your iOS device will now try to locate your Exchange Server using Microsoft’s Autodiscovery
service, and then will display the configuration screen.
4. Choose which type or types of data you would like to synchronize: Mail, Contacts, and
Calendars.
*Note that by default, only three days’ worth of email is synchronized. To synchronize
more, go into Settings, then Mail, Contacts, Calendars, select your Exchange account, and tap on
Mail days to sync.
*Note that after configuring an Exchange ActiveSync account, all existing
contact and calendar information on the iOS device is overwritten.
- The settings are:
Important Notes:
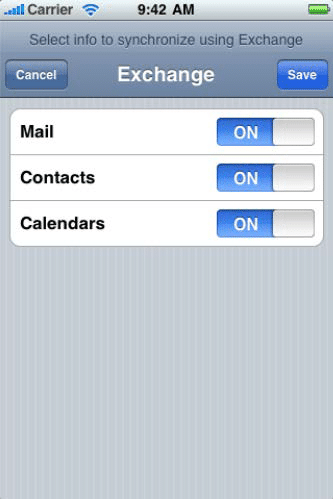
• Mail – Select Mail to synchronize your Exchange email.
• Allows you to send and receive Exchange email.
• Allows you to send and receive Exchange meeting invitations.
• Recommended for all Exchange users.
• Contacts – Select Contacts to synchronize your Exchange contact list.
• Allows you to access your contacts in Exchange.
• New contacts you create on iPhone, iPod touch, and iPad are synced with Exchange and are
then available in Outlook and Outlook Web App (OWA).
• Recommended for some Exchange users. If you maintain an up-to-date list of contacts in
Outlook or OWA and you want access to those contacts on your iPhone, iPod touch, or iPad,
then you might want to sync contacts.
• Important: When you set up Exchange on iPhone, iPod touch, or iPad, you may be asked if you
would like to Keep or Delete the local contacts on your device. Unless you want the contacts on
your device to be deleted and replaced with your contacts in Exchange, choose Keep.
• Calendars – Select Calendars to synchronize your Exchange calendar.
• Allows you to access your Exchange calendar.
• Allows you to create appointments on your Exchange calendar.
• Allows you to create and receive meeting invitations on your Exchange calendar.
• Recommended for all Exchange users.
• Important: When you set up Exchange on your iPhone, iPod touch, or iPad, you may be asked if
you would like to Keep or Delete the local calendar on your device. Unless you want the
calendar events on your device to be deleted and replaced with your Exchange calendar, choose
Keep.